Photos.
They’re the first thing your potential clients are going to look for when they check out your website and think about if they would like to join or not.
In addition, every member wants to see themselves in a sweet picture up on your blog, talk about bragging rights for the rest of the day!
There’s a huge difference in the draw of a picture though. A grainy, out of focus photo that is dark and not well thought out is, well, not all that alluring. It certainly isn’t enough to get someone off of the couch and into your box.
So how do you get sweet photos for your gym? Hiring a professional on a contracted gig is an option, but can become costly unless you know the right people. You can also purchase rights to stock photography that look amazing, however, this doesn’t solve the problem of getting great photos of your members.
You don’t need to throw a lot of cash into a photography venture however, because we’ve got a great tutorial for you. From software, picking a camera, editing and composing, read on to change the look of your site for the better.
Software
The first and arguably most important step, is to find a photo-editing program and start playing around with it. Its even more important than the camera and there are a ton of options out there today.
Google Photos
Currently we recommend Google Photos online photo editor for starting out. Play around with the editing sliders, paying special attention to the “light” and the “blacks” and/or “contrast” to start making your images pop.
There are so many phone camera apps now that let you take good gym photography you just have to find one which works well for you. If you’re taking photos from your phone, then editing in Instagram or Facebook removes at least one step from the process, but that being said, most photo apps let you export directly to those social media services.
Professional – Lightroom or Aperature
When you decide to graduate from the beginning programs, look at Adobe Lightroom or Apple’s Aperature to take it to the next level and really control what your clients and potential clients see when they open your website.
Don’t worry about using Photoshop or GIMP, they will just slow you down. You want basic, quick edits to give your pictures some POW! The 80-20 rule applies just as much here as everywhere else in life.

The key is to play around, try out the special filters, make the photo black and white, sepia, grainy, salty, baked in the oven, just TRY new things. It only take a couple minutes unless you go gangbusters and the results are amazing. Your members will love your creativity and strangers will take a second look.
Choosing a Camera
What kind of camera will help you get the best pictures? How much should it cost? Where do you buy one? Do you need a special lens?
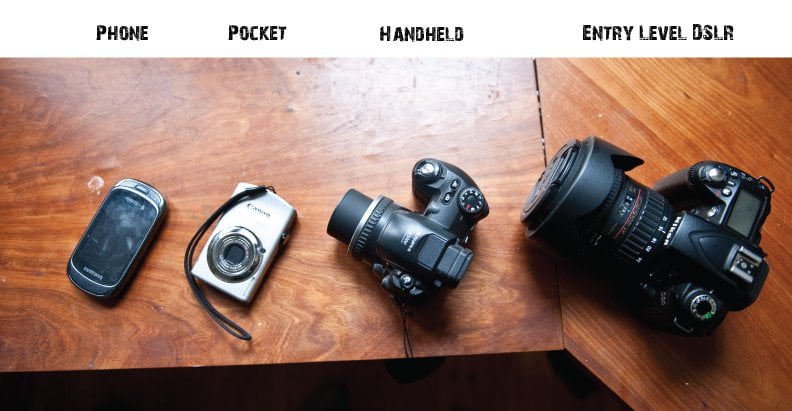
The thing with cameras these days, is that they’re all getting to be pretty similar, and how do you tell them apart? Let’s break it down into 4 categories, phone, pocket, handheld+zoom, dslr.
Phone Cameras
Phone cameras are getting to the point where they take a pretty decent picture, but they’re all pretty wide-angle and its kind of like aiming a grenade, not very specific. Not to mention you get a lot of collateral image. But they are a good place to start because everyone’s got one. Just send yourself the image so you can edit it in your new software. There are also some good android and iphone apps for editing pictures on camera, choose one with lots of preset filters to make it even easier.
Pocket Cameras
Pocket cameras are similar to phone cameras, but you get a better lens that can often zoom pretty well. It can fit in your pocket so its easy to have on you, but it can also mount on a tripod so you can use it as a video camera to instruct on form and technique. You can take more images faster and the image storage card comes out so you can easily transfer images to your computer for editing. Ok, but probably better to skip this option if you decide to take the photography seriously.
Entry Level Prosumer Cameras
Handheld+good zoom (enthusiast) cameras have a pretty darn good lens that often reaches from wide-angle to 10x what the human eye can, which is slight overkill, all in one package. These cameras often give you a lot of control over the settings, a nice display for review and the ability to shoot HD video. A good all-around choice.
Professional Level Cameras for your gym photography
DSLR (digital single lens reflex) cameras give you the most control, allowing you to swap in different lens for different situations, although there are some lens that let you cover wide-angle+zoom in one package. These cameras will have the best optics, shoot the fastest, but require the most attention. When you decide to go for one of these, you commit to taking good pictures, so make sure you are editing your product.
With advanced camera systems there are a ton more options than there were 10 years ago, with great offerings from Canon, Nikon, Sony, Fuji, Olympus… Basically everyone has a good camera and a whole host of lens available.
More important than the brand is the speed and aperture of the lens. You want something that can take those low-light gym images, pull out a bunch of detail and do it quickly. If you have to choose where to spend your money, choose a high performance lens with a low aperture and a camera body that does a great job in low light.
Whichever camera you choose, when you start out, go through the settings and choose to use the finest quality jpeg you can, this will give you more options (by retaining the most detail) when you decide to edit the pictures. Some cameras have pretty good in camera photo editing so you can always choose to take advantage of that to cut down on work afterwards.
Recommendations
Phone – iPhone
Pocket – Canon or Nikon – these two are interchangeable
Handheld – Canon Powershot or Nikon Coolpix
DSLR – Canon Rebel or Nikon prosumer models
Composing a photo
Gym Photography is all about composure and the best way to get a good shot. There are two main ways to change the composure of a photograph; zoom and movement (by getting closer, farther, lower or higher).
Another way to think of it is in camera, and out of camera.
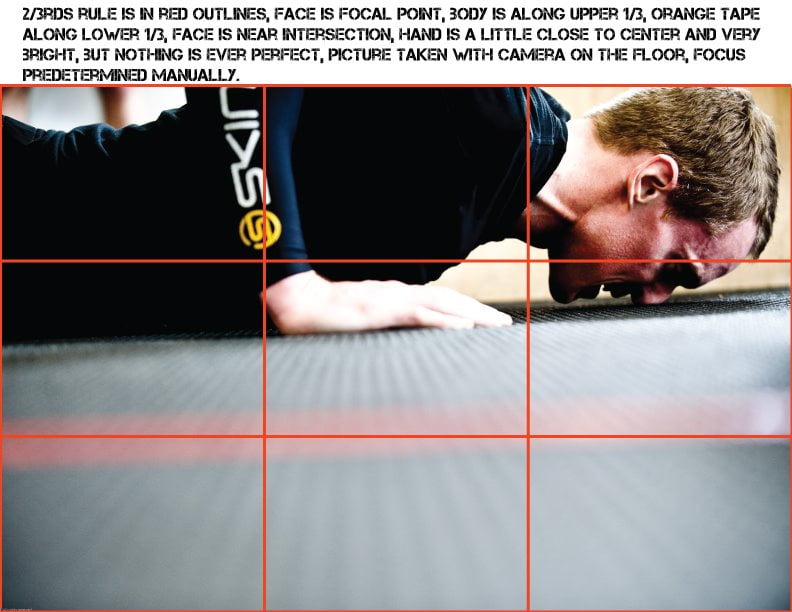
The viewfinder and the 2/3rds rule
The in camera stuff is pretty easy, and there’s a general rule that helps you take good photos called the 2/3rds rule. Basically, you imagine that the viewfinder or screen is divided into 1/3rds with lines at each horizontal and vertical 1/3rd. This will give you a grid of 9 boxes, and you’re basically trying to line up the focal point (head, bar, wallball, athlete) along one of those 1/3rds or where they intersect.
This rule works for 90% of pictures and will help keep the eye moving around the frame (the eye naturally wants to go to the center and when it finds nothing there, it searches for the subject, engaging the brain and making the picture more interesting). Once you’ve figured out the rule, feel free to break it, just avoid centering the subject unless you have a great background to complement some symmetry.
Moving your body
Out of camera composition is a little more difficult as it requires you to move around, sometimes to an uncomfortable position, but generally provides for much better shots. Pictures taken from your standing eye-level are often pretty boring, because that’s what you see all the time.
If nothing else, squat down a few inches to grab your shot, I like to aim for the camera to be around the same level as the athlete’s sternum. A general rule is to keep the camera lower than the focal point, which is often the face, I find myself with one knee on the ground more often than not. Squatting down can give you an even better perspective and getting the camera as close to the ground as possible is a great way to get a cool effect.

Confidence
Confidence is a weird thing to include in a post on sports photography but if you’re going to be taking
pictures at a CrossFit Affiliate Community event, you’re going to need to be able to move up close and personal to get the good shot. Everybody has those pictures of athletes from 15 feet away, other people’s heads in the foreground and who knows what in the background. What we’re aiming for is the close up shot, just focused on that last rep, the teammates hugging, the chalk floating through the air, you know, the good stuff.
This requires confidence to politely move around someone. The confidence to stand in front of an athlete and grab a quick shot of them staring directly into the camera, or to yell at them to pick back up the bar so you can grab that initial instant of contact (and encourage them to keep working). Get in there with the athletes, at their level, amongst their barbells (while being careful), and grab the good shot. Confidence is all about pride in the photos you’re taking, because you know they will help your gym’s image, or inspire the person who sees their own badassness in the photo you took.
Editing
So you’ve gotten in athlete’s faces and cheered them on while snapping away, got an ant’s view world of a barbell, even woken up at the crack of dawn to snap a couple shots of those early morning frosty breaths of an outdoor 400m repeat day. But they still look kinda bland. ARGH!! That’s because you’ve only fought half the battle. All further instructions will be in Adobe Lightroom as that is what I use and know the best. It is an indispensable photo-organizing and editing program that lets me do all of my photos (that aren’t going to print or special use)
- Begin going through photos to get rid of out-of-focus, off-target, severely under/over-exposed and/or dumb images
- Pick one photo to edit and make it look really good, apply that edit to every photo in the shoot if your program allows. Fix the exposure of the ones that were under/over-exposed
- Sort through the photos to find the ones you like best of any given sequence, if you’re taking enough photos, chances are you have 3-8 of any given person doing a movement. I just like to pick my favorite and delete the rest, but I know photographers who keep every single photo that’s in focus. I say they’re packrats, I don’t need all that shi% filling up my hard-drive. If you’re diligent, start keywording photos so you can easily find them later.
- Crop and finetune the photos that have survived the cut. Experiment with different settings, grayscale, sepia, saturation, contrast, clarity, blacks, HDR, single -color manipulations, etc… play with the sliders.
- Zoom out so you can see 9-16 photos on the screen at once, and review them for lightness/darkness, adjust so that what you want to be at the proper exposure is correctly there.
- Export to your designated folder and then use some image-sharing technique to deliver to the client.